-
1. Introduction
- 1.1 About ZenTao
- 1.2 Introduction PDF
- 1.3 Technical Support
- 1.4 Follow Us
-
2. Installation
- 2.1 Choose the Right Installation
- 2.2 ZenTao Cloud
- 2.3 One-click Installation for Windows
- 2.4 One-click Installation for Linux
- 2.5 Lampp Installation in Linux
- 2.6 Source Code Installation (for all systems)
- 2.7 Source Code Installation for macOS
- 2.8 XAMPP-VM Installation for macOS
- 2.9 XAMPP Installation for macOS
- 2.10 Install ZenTao in Docker
- 2.11 Install httpd, Mariadb, PHP 7.2 in Cent OS 8
- 2.12 Softaculous Service
- 2.13 Install Ioncube
- 3. Update
-
4. Users and Groups
- 4.1 Company Structure
- 4.2 Add a User
- 4.3 Manage Users in batches
- 4.4 Groups and Privileges
-
5. Quick Start
- 5.1 Project and Task Management
- 5.2 Bug Tracking
- 5.3 Product Management
- 5.4 Todo Management
-
6. Basic Application
- 6.1 Basic Workflow
- 6.2 Agile and Scrum
- 6.3 ZenTao and Scrum
- 6.4 ZenTao Tutorial for Rookies
- 6.5 Create a Product
- 6.6 Create a Story
- 6.7 Create a Project
- 6.8 Confirm a Story
- 6.9 Decompose Stories into Tasks
- 6.10 Report a Bug
- 6.11 Manage Contacts
- 6.12 Customization
- 6.13 Import Excel, CSV Files
- 6.14 Document Management
- 6.15 Work Mode
- 6.16 Points
- 6.17 Required Field
- 6.18 Privileges
- 6.19 Annual Work Summary
-
7. Advanced Application
-
7.1. Workflow
- 7.1.1 ZenTao Workflow
-
7.2. Individual management
- 7.2.1 My Todo
- 7.2.2 My Task, Story and Bug
- 7.2.3 My Profile
-
7.3. Product Owner
- 7.3.1 Manage a Product
- 7.3.2 Manage a Product Line
- 7.3.3 Create and Review a Story
- 7.3.4 Change and Review a Story
- 7.3.5 Status and Phase
- 7.3.6 Story Writing
- 7.3.7 Product Module
- 7.3.8 Release Plan
- 7.3.9 Create a Release
- 7.3.10 Roadmap
- 7.3.11 Documents
- 7.3.12 Planning Meetings
- 7.3.13 Daily Scrum, Review and Retrospective Meetings
- 7.3.14 Story Reports
-
7.4. Scrum Master
- 7.4.1 Create a Sprint
- 7.4.2 Set a Team
- 7.4.3 Confirm a Story
- 7.4.4 Task Breakdown
- 7.4.5 Daily Standup Meetings
- 7.4.6 Check Project Progress via Burndown Chart
- 7.4.7 Check Project Progress via Lists
- 7.4.8 Review and Retrospective Meetings
- 7.4.9 Basic reports on tasks
-
7.5. Development Team
- 7.5.1 Project planning meeting and task breakdown
- 7.5.2 Claim tasks and update efforts
- 7.5.3 Kanban and Tree Diagram
- 7.5.4 Build
- 7.5.5 Test Request
- 7.5.6 Resolve a Bug
- 7.5.7 Documents
- 7.5.8 Confirm Bugs
-
7.6. Test Team
- 7.6.1 Bug Tracking
- 7.6.2 Report a Bug
- 7.6.3 Verify and Close a Bug
- 7.6.4 Activate a Bug
- 7.6.5 Find a Bug
- 7.6.6 Test Case
- 7.6.7 Create and Review Test Cases
- 7.6.8 Test Suites, Public Case Libs and Reports
- 7.6.9 Manage Test Requests
- 7.6.10 Run Cases and Report Bugs
- 7.6.11 Reports
-
7.1. Workflow
-
8. Configuration
-
8.1. Maintain ZenTao
- 8.1.1 Initialize scripts
- 8.1.2 Data Backup
- 8.1.3 Recover the Deleted
- 8.1.4 Update Burndown Charts
- 8.1.5 ZenTao Remote Host
-
8.2. Deploy ZenTao
- 8.2.1 Guest Login
- 8.2.2 Email Notification
- 8.2.3 Set Super Admin
- 8.2.4 Static Access
- 8.2.5 Remove "zentao" from URL
- 8.2.6 Integrate SVN
- 8.2.7 Integrate Git
- 8.2.8 Integrate Webhook
- 8.2.9 Integrate Xuan.im
- 8.2.10 Integrate Zdoo
- 8.2.11 Integrate Third-Party Apps
- 8.2.12 Password-Free Login
- 8.2.13 Translation Add-on
- 8.2.14 Integrate Jenkins
- 8.2.15 Extension
- 8.2.16 Fix Weak Password
-
8.1. Maintain ZenTao
-
9. Customization
- 9.1 Introduction
- 9.2 Directory
- 9.3 Find Codes
- 9.4 Database Structure
- 9.5 Common Modules
- 9.6 Add Features to Menu
- 9.7 Set Privileges to Modules
- 9.8 Examples: modify language prompt
- 9.9 Examples: set priority when creating bugs
- 9.10 Extension Editor
- 9.11 Feature Limitation
- 9.12 ZenTao Packaging Standards 1.1
-
10. Misc
- 10.1 About Third-Party Code
- 10.2 Support ZenTao
- 10.3 ZenTao Service
- 10.4 Acknowledgement
Integrate SVN
- 2015-09-14 11:29:35
- azalea
- 14838
- Last edited by Troy on 2021-01-29 13:50:25
- Share links
SVN has been integrated to ZenTao 2.2+, which links ZenTao and codes, and makes it convenient for users to view codes. The followings will show you how to integrate SVN in ZenTao.
1. Subversion integration
The basic mechanism for Subversion integration is to
Analyze code comments submitted => Get linked task, and bug IDs => Write IDs to ZenTao database.
Users have two ways to do it. One is to use the hook built-in SVN. When the code is committed, a hook script is triggered. It will analyze the comments and get the IDs of the linked tasks, and bugs, and then call ZenTao API and record it in the database. The other way is to use LOG command at SVN client to get all the committed code and analyzes it to get the IDs, and then save it in the database.
Either way has its pros and cons. The second way is used in ZenTao because it is easier to debug and more convenient to deploy. Besides, it can also analyze all the previous records with more flexibility.
2. Deploy SVN command-line client on machines installed ZenTao
SVN command lines are to commands built-in SVN. It is svn.exe in Windows and svn in Linux. The machine that ZenTao is installed can be independent of that one SVN is installed. They don’t have to be installed on the same machine.
2.2 The latest Windows one-click installation package has built-in svn.ex e in the directory of \xampp\silksvn .
2.3 If you install SVN in Windows, download slilksvn and then install it.
3. Configure SVN in ZenTao
Since ZenTao 12.1, the best way to configure SVN is: Login as Admin, and go to CI - Repo - Create to configure your SVN repository. ( That you should refer to the manual "Integrate Jenkins", https://www.zentao.pm/book/zentaomanual/scrum-tool-with-jenkins-integration-258.html ) And You just need to look over Step 1. Create a repo in there.
After your configuration of SVN successfully, you should jump to Step 4. Comment
3.1 Code
The configuration file of SVN is saved in zentao/module/svn/config.php. You can modify it and save the modified to svn/ext/config/svn.php. So later it will not be overridden, if updated.3.2 Configuration
As for setting subversion parameters, there are concepts involved as follows.Parameters below are involved in configuring SVN.- the SVN client
- repo: multiple repos can be set.
- Username and parameters of the repo
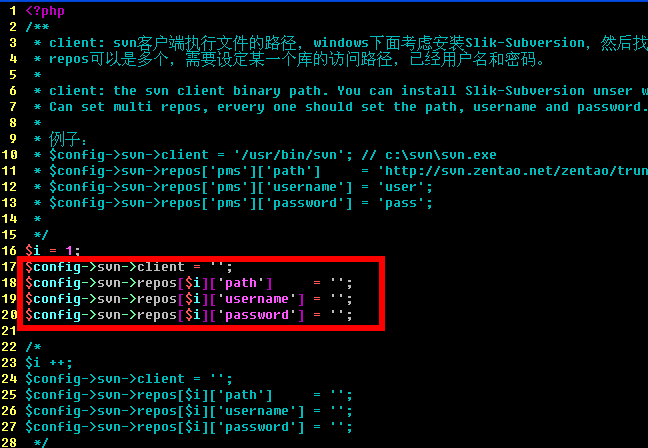
3.2.1 Find the labeled with a red box in the image below

3.2.2 Modify the code
Modify codes as shown below.

$config->svn->repos[$i]['path'] the path to save SVN code
$config->svn->repos[$i]['username'] save SVN login user name; Leave it blank if you don’t need to log in.
$config->svn->repos[$i]['password'] save SVN login password
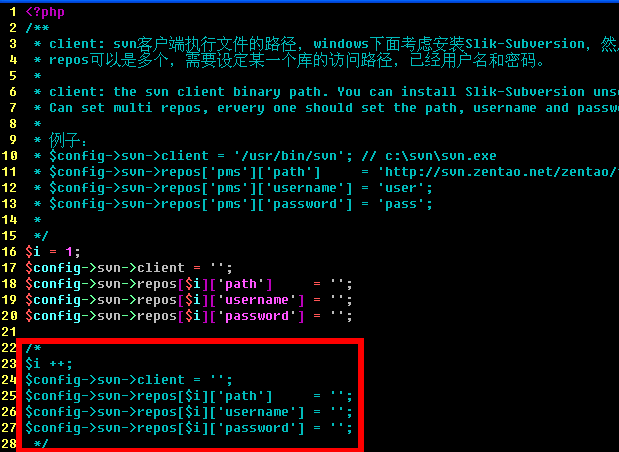
3.3 Set multiple repos
3.3.1 Find the following code in the same file.

3.3.2 Modify the codes
- Delete “/*”and”*/“ from the code and modify it as mentioned above. Notes: $i ++ cannot be changed.
- For any svn repos, copy the code and configure it in the same way.
4. Comment
When committing codes to SVN, developers need to specify relevant stories, tasks or bug IDs of changes in the comments. Please follow the format below.
- bug#123,234, 1234 or bug: 123,234 1234; comma or space can be used as space holders among IDs;
- task#123.
- bugs and tasks must be labeled.
5. Synchronize SVN
5.1 Refer to 8.1.1 Initialize Scripts to initialize all the scripts of command lines.5.2 Enter zentao/bin/ and execute syncsvn.bat or syncsvn.sh.
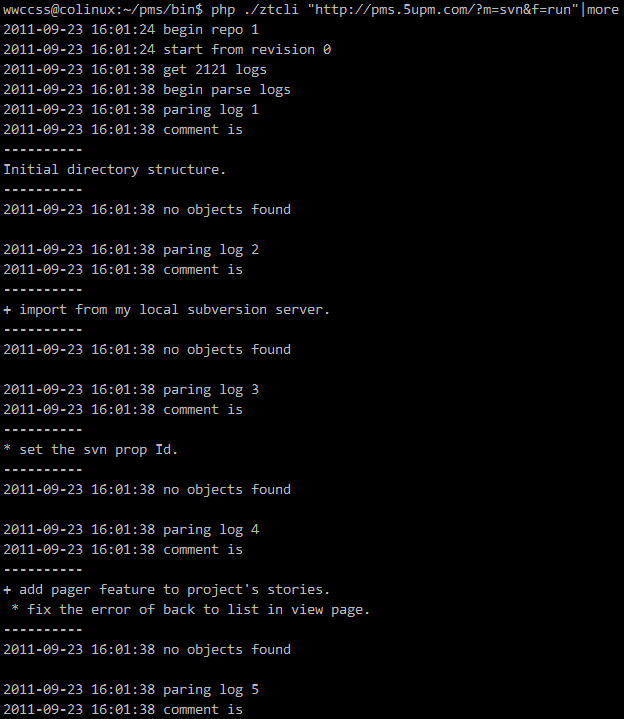
5.3 The execution is shown below.

5.4 Check the linked bugs in ZenTao

5.5 FAQ
The following problems are often seen in source code installation.
Run the script to synchronize SVN, and the error is shown
Run the command as shown in the notice manually, and the excution is done.
Solutions: In php.ini, cancel shell_exec() of disable_functions. Restart php-fpm and WebSever.
6. Deploy the cron
When all the commands are deployed, add the commands to the cron. For example, execute the tasks every 5 minutes.
Solution 1: Login ZenTao in the browser. Go to Admin->Cron and switch it on. Click Activate to synchronize SVN scripts. After you change the parameter, follow the steps below: Go to Admin->Cron and click Cancel=> Restart Apache=> Go to Admin->Cron and click Start.
Solution 2: Use the cron feature in your system. Go to Control Panel->Cron in Windows or use crontab in Linux.
7. Notes
It is not recommended use to https or ssh, because it involves verification and integration for https and ssh certificates, which can be quite complicated.
It is complicated to configure SVN. If you cannot do it yourself, think about our service and contact us at [email protected] to know more about technical support =)
Support
- Book a Demo
- Tech Forum
- GitHub
- SourceForge
About Us
- Company
- Privacy Policy
- Term of Use
- Blogs
- Partners
Contact Us
- Leave a Message
- Email Us: [email protected]


